
How to set up Trengo with Monema
Functionalities offered
- Display the Trengo contact name when you receive an incoming call. This will be displayed on the screen if you have a SIP terminal, in the pop-up window of the softphone if you have one installed and/or as a notification within the Trengo panel when an extension with an associated user is called.
- Register incoming, outgoing and missed calls coming from one of your Trengo contacts in the call list of the Monema PBX panel with the name of that contact.
- Keep a record of calls by creating and editing the tickets associated with each contact; this will also include a link to the call recording (only if that option has been enabled).
In addition, if you have the Chrome extension installed (see Setting up extension for Google Chrome):
- Make calls from the contact’s own file.
- Access the contact’s file.
From the Monema application you will be able to:
- Access the contact's file.
Requirements
- You must have a Monema account, if you don’t have one click on Free Trial.
- It is recommended to have the PBX configured before starting to configure the integration.
- Have a Trengo account (Scale or Enterprise) and have an account with the administrator role.
1. Generate an API key in Trengo
In order for the Monema service to access Trengo contacts, we need to generate an API key.
- Access your Trengo dashboard with the credentials of an administrator user.
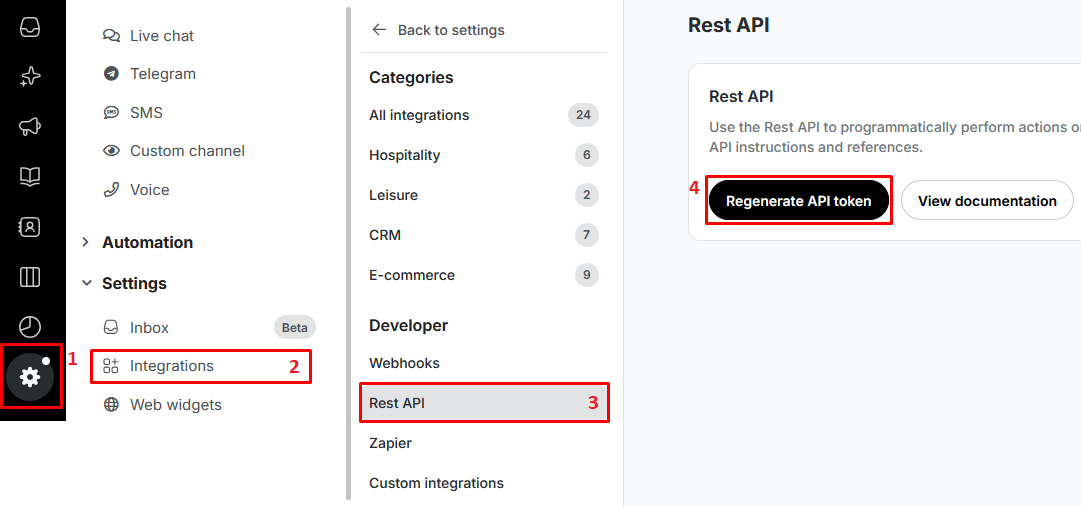
- Click on the menu option Settings > Integrations > Developer > Rest API > Generate API token.
- Keep this password safe as you will not be able to display it again, just generate a new one.
2. How to set up a channel
Before you start configuring it is important to understand how Trengo works so that you don’t configure the integration incorrectly.
In Trengo, a channel is the means by which calls are routed, it allows Trengo users to be notified whether a call is directed to them or not.
- Each channel that is created has a single telephone number associated with it in international notation (+34…, +31…, etc).
- In turn, in each channel it will be necessary to indicate which Trengo users will receive the notification and which will not. Each Trengo user must be associated with an extension number. This should be in accordance with what is configured in your Monema virtual switchboard. Monema will notify Trengo which extension is being called in real time, depending on how you have configured it.
Once you have understood this, let’s see how to create a channel. Note that you will have to create as many channels as phone numbers you have in your Monema virtual PBX and you want to manage from Trengo.
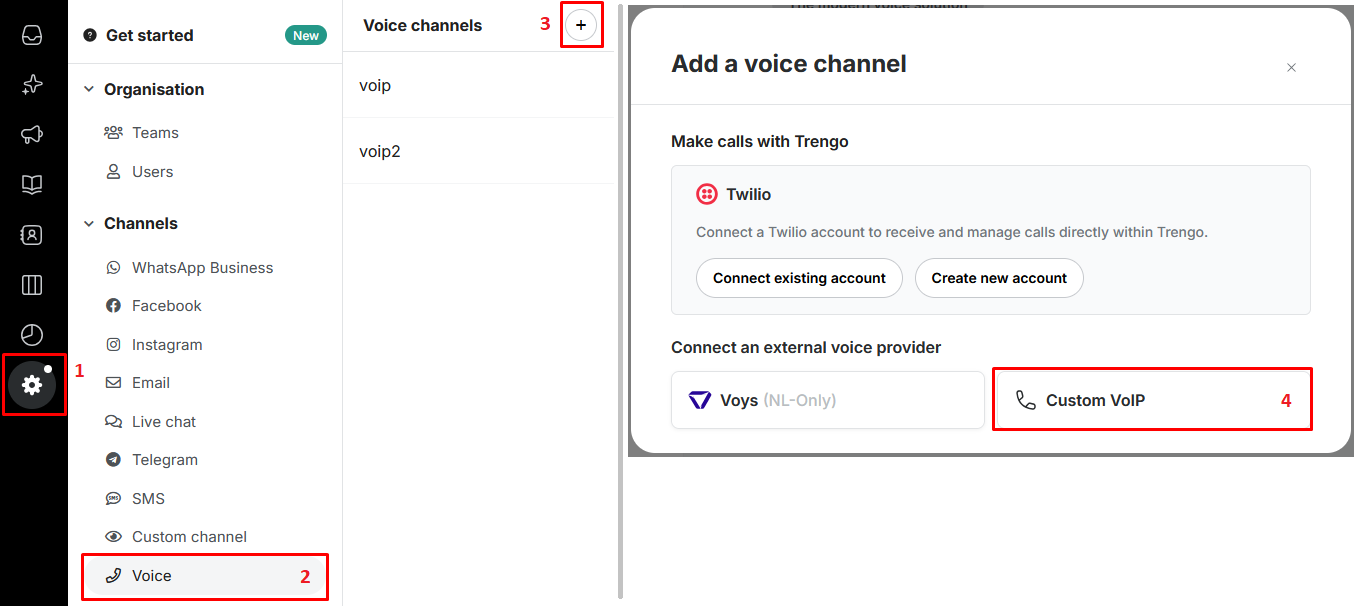
To create a channel, log in to your Trengo account as an administrator, click Settings > Channels > Voice > Click the (+) next to "Voice channels" > Select "Custom VoIP".
The channel fields must now be filled in:
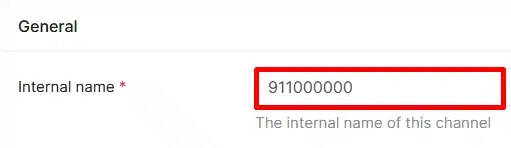
- Enter the name for the channel ➜ We recommend that it is something descriptive, as each channel is associated with a phone an example would be “911000000“. This will only help you to identify each channel in Trengo.
- Enter the telephone number of your virtual PBX ➜ The telephone number must be entered with the corresponding prefix (+34, +NN), this is the international format.
- SIP devices ➜ Here you must indicate which of your extensions are linked to which account. In other words, you have to indicate the extension numbers you have created in the Monema virtual PBX and the associated Trengo users they go to. In this way you will be able to notify these extensions when a call comes in.
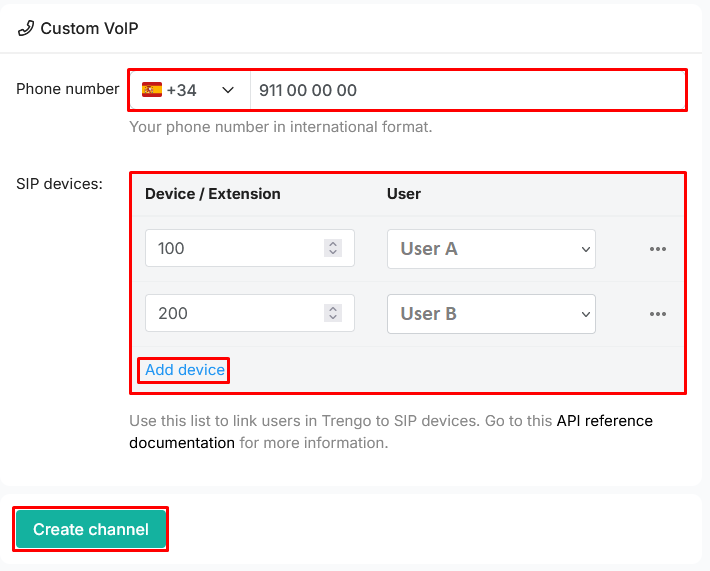
Finally click on “Create channel“, this will generate a “Webhook” is an address which we will need later to configure the integration in the virtual PBX. If you create several channels, there will be a different address for each of them.
3. How to configure users to be able to open tickets during a call
When a user with an associated extension defined in a channel receives a call, the off-hook notification will show “Open conversation” when clicked will take you directly to the contact’s ticket showing the contact’s messages.
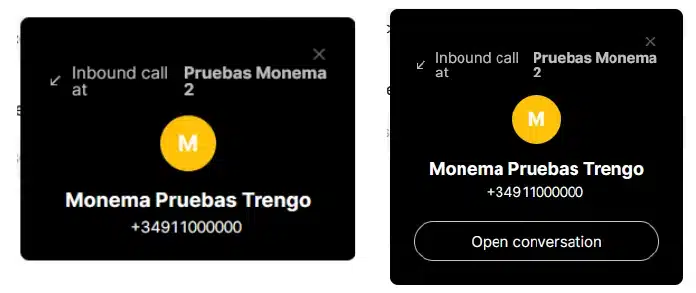
However, users whose role is “Basic agent” will not be able to open tickets. This can be changed in Settings > Users > In the “User role” section, you can assign the corresponding roles.
4. Set up the Monema virtual PBX integration
Access the PBX panel via an administrator user to configure the integration.
Click on the menu option Integrations > Search for the Trengo integration and activate the integration by clicking on the left button.

You must then fill in the fields with the data previously obtained.
- Trengo API Key ➜ Enter the API key generated in point 1.
- Get contact name ➜ If enabled, when a call is received it will search through Trengo’s contacts and try to get the name of the contact. The caller’s name will be displayed in the call list whether a call has been made or received.
- Notifying Trengo users of the call and storing the information in a ticket ➜ When a call comes in, it will be notified to each extension in Trengo and once an extension/user picks up, they will be able to access the contact’s ticket. As soon as the call ends, information about the call including the recording will be stored in the ticket if the option a link to the recording is activated.
- If you have activated this option, you must add channels with the corresponding telephone number and enter the URL addresses (Webhooks) generated when creating the channels in Trengo. These can be seen in the Trengo dashboard under Settings > Channels > Voice > When you click on one of the channels, this URL or Webhook should appear at the bottom. If you have doubts about this, check point 2.
- Display call recordings in Trengo ➜ This will only be displayed if you have enabled the option “Store call information as a ticket and notify users.”
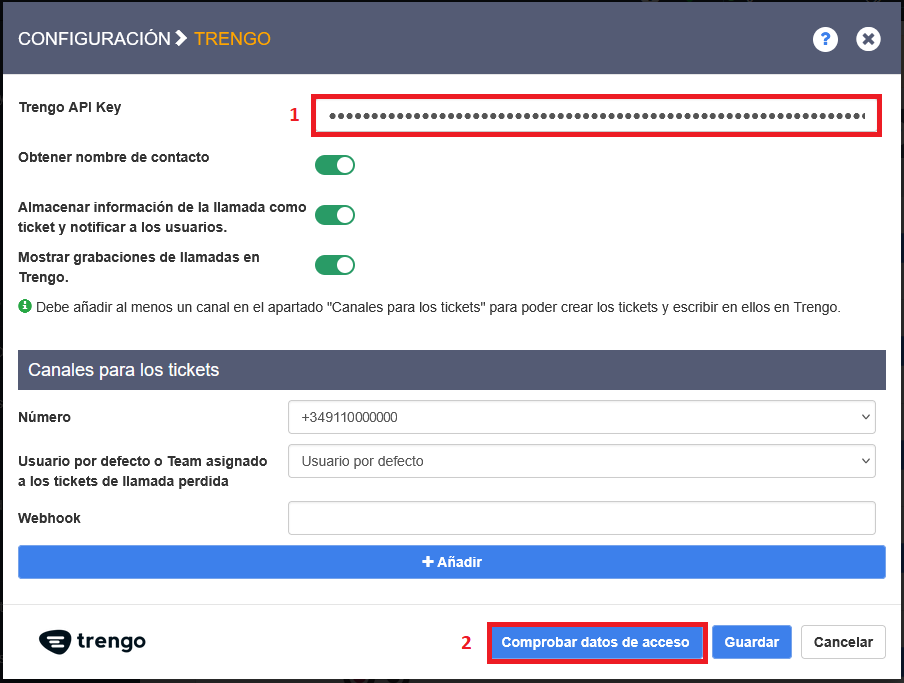
Click "Check login credentials" to verify that Monema can connect to Trengo and update the teams; if there is an issue, the error will be displayed.
Finally click on "Save".
If you’ve made it this far, you’ve already got the integration fully configured.